Wednesday, November 11, 2020

odoo 14: point of sale show qty_available


edit /odoo/addons/point_of_sale/static/src/xml/Screens/ProductScreen/ProductItem.xml line 9 as below:

            <div class="product-img">
                <img t-att-src="imageUrl" t-att-alt="props.product.display_name" />

                <span class="qty_available">
                    <t t-esc="props.product.qty_available" />
                </span>

                <span class="price-tag">
                    <t t-esc="price" />
                </span>

            </div>

edit /odoo/addons/point_of_sale/static/src/css/pos.css add at line about 1202

.pos .product .qty_available {
    position: absolute;
    top: 2px;
    left: 2px;
    vertical-align: top;
    color: white;
    line-height: 13px;
    background: #7f82ac;
    padding: 2px 5px;
    border-radius: 2px;
}

Tuesday, November 10, 2020

odoo 14: point of sale filter pos with on hand quantity


we only want to show product with on hand quantity

edit /odoo/addons/point_of_sale/static/src/js/models.js

start at line 413, edit line 419 var domain
        model:  'product.product',
        fields: ['display_name', 'lst_price', 'standard_price', 'categ_id', 'pos_categ_id', 'taxes_id',
                 'barcode', 'default_code', 'to_weight', 'uom_id', 'description_sale', 'description',
                 'product_tmpl_id','tracking', 'write_date', 'available_in_pos', 'attribute_line_ids'],
        order:  _.map(['sequence','default_code','name'], function (name) { return {name: name}; }),
        domain: function(self){
            var domain = ['&', '&', '&', ['sale_ok','=',true],['available_in_pos','=',true],'|',['company_id','=',self.config.company_id[0]],['company_id','=',false], ['qty_available', '>', 0]]; // edit here

add '&' and ['qty_available', '>', 0] like above

reference:

https://www.odoo.com/forum/help-1/question/automatically-remove-products-from-pos-when-products-are-out-of-stock-in-v8-0-123229

Friday, October 23, 2020

Odoo14: POS import products with category

Inventory Product Category

Create product category to import

For example my csv file

"External ID"    "Name"    "Parent Category/External ID"
"cat_besi_kayu"    "Cat Besi / Kayu"    "product.product_category_all"
"cat_besi_kayu_junior"    "Cat Besi / Kayu Junior"    "cat_besi_kayu"

Note:

  • first line is header
  • tab separator and "" string delimiter
  • product.product_category_all is build in root for all categories.

From Inventory -> Configuration -> Product Categories -> Favorites -> Import records, load your category csv file to import. Test it first before real import.

POS Product Category

Create POS product category to import

For example my csv file

"External ID"    "Category Name"    "Parent Category/External ID"
"all"    "All"    ""
"cat_besi_kayu"    "Cat Besi / Kayu"    "all"
"cat_besi_kayu_junior"    "Cat Besi / Kayu Junior"    "cat_besi_kayu"

Note:

  • first line is header
  • tab separator and "" string delimiter
  • product.product_category_all is build in root for all categories.

From Point of Sale -> Configuration -> Products -> POS Product Categories -> Favorites -> Import records, load your category csv file to import. Test it first before real import.

Product

Create products to import

For example my csv file

"ID";"Name";"Sales Price";"Cost";"Quantity On Hand";"Available in POS";"Can be Purchased";"Can be Sold";"Customer Taxes/Amount";"Description";"Product Category / External ID";"Product Type";"Point of Sale Category/Parent Category"
"Junior_66_NP657";"Junior 66 NP657";"80000";"75000";"0";"1";"1";"1";"0";"Septia Brown* Junior 66 Cat Besi/Kayu *0.2L 0.94L 3.785L 20L TC";"cat_besi_kayu_junior";"Storable Product";"cat_besi_kayu_junior"

Note:

  • first line is header
  • ; separator and "" string delimiter
  • cat_besi_kayu_junior is external ID from product category csv file.

From Inventory -> Configuration -> Products -> Products -> Favorites -> Import records, load your product csv file to import. Test it first before real import.

Monday, October 12, 2020

windows 11/10/8/7 general repair


Repair directory system

  1. run cmd as administrator or windows powershell (admin)
  2. run C:\WINDOWS\system32> chkdsk c: /f
  3. restart PC to complete chkdsk

Repair general windows file system

  1. run windows powershell (admin)
  2. run C:\WINDOWS\system32> sfc /scannow

Note: you can repair directory using chkdsk or repair file system using sfc in safe mode

If you encounter "windows can not fix" after running "sfc /scannow", you can try to repair windows 'image' file system

  1. run windows powershell (admin)
  2. run C:\WINDOWS\system32> DISM /Online /Cleanup-Image /RestoreHealth

Note: Yout need online to restore windows image

DIMS Option:

  • DISM /Online /Cleanup-Image /CheckHealth -> check windows 'image' system
  • DISM /Online /Cleanup-Image /ScanHealth -> check windows 'image' system, deeper then checkhealth
  • DISM /Online /Cleanup-Image /RestoreHealth  -> restore windows 'image' system
  • DISM /Online /Cleanup-Image /StartComponentCleanup -> repair windows component (after DISM Error 14098)

If you have windows 11/10/8/7 cd, F: is your CD/DVD ROM

  • DISM /Online /Cleanup-Image /RestoreHealth /Source:F:\Sources\install.wim

Sunday, October 4, 2020

Upgrade firmware Evercoss S50 Genpro X Pro V13 Maret 2018

Sistim PC yang digunakan:

  • windows Version 10.0.18362 Build 18362
  • QGDP_AssemblySPort_V3_1_8_0630_OFFLINE.rar
  • EVERCOSS_S50_7_0_021_P1_180314_OE_CPB.zip

Install QGDP_AssemblySPort_V3_1_8_0630_OFFLINE

  1. Download QGDP_AssemblySPort_V3_1_8_0630_OFFLINE.rar di http://evercoss.com/img/software/QGDP_AssemblySPort_V3_1_8_0630_OFFLINE.rar 
  2. extract dan install. bahasanya rada alien next aja, eh defaultnya aja. saya juga kagak tau mana nextnya

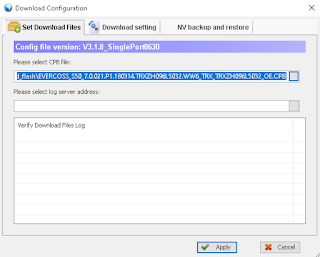
Download firmware EVERCOSS_S50_7_0_021_P1_180314_OE_CPB.zip dari situs Evercoss resminya di http://evercoss.com/download/detail/s50. Jangan ketukar dengan S50D! Lalu extract dan akan muncul file EVERCOSS_S50_7.0.021.P1.180314.TRXZH096L5032.WW6_TRX_TRXZH096L5032_OE.CPB.

Driver tidak diperlukan untuk windows 10 Version 10.0.18362 Build 18362

Upgrade firmware QGDP Assembly Single Port

  1. klik kanan aplikasi dan jalankan aplikasi dengan mode "Run as administrator"
  2. masukan User: Assembly dan password ase atau 369
  3. klik config
  4. masukan file cpb pada "Please select CPB file" dan klik Apply


  5. tunggu sampai selesai mengextract dan mengecek filenya.
  6. Setelah selesai, sabungkan handset Evercoss S50 (Genpro X Pro) yang akan di flash menggunakan kabel USB yang baik.
  7. tunggu sampai windows selesai menginstall drivernya. Biarkan posisi pada charging only.
  8. seletah selesai, klik start.
  9. setelah itu, dalam kondisi handset masih tersambung ke PC, restart handset. -> Kuncinya disini!


  10. bilamana tidak ada kendala, aplikasi akan mendeteksi handset dan memulai mengupdate firmware (persentase download & progress berjalan)
  11. tunggu sampai selesai. di log akan muncul Disconnect the device dan Downloading CPB: Successfull
  12. lepaskan kabel usb dari handset dan nyalakan handset