Wednesday, November 11, 2020

odoo 14: point of sale show qty_available


edit /odoo/addons/point_of_sale/static/src/xml/Screens/ProductScreen/ProductItem.xml line 9 as below:

            <div class="product-img">
                <img t-att-src="imageUrl" t-att-alt="props.product.display_name" />

                <span class="qty_available">
                    <t t-esc="props.product.qty_available" />
                </span>

                <span class="price-tag">
                    <t t-esc="price" />
                </span>

            </div>

edit /odoo/addons/point_of_sale/static/src/css/pos.css add at line about 1202

.pos .product .qty_available {
    position: absolute;
    top: 2px;
    left: 2px;
    vertical-align: top;
    color: white;
    line-height: 13px;
    background: #7f82ac;
    padding: 2px 5px;
    border-radius: 2px;
}

Tuesday, November 10, 2020

odoo 14: point of sale filter pos with on hand quantity


we only want to show product with on hand quantity

edit /odoo/addons/point_of_sale/static/src/js/models.js

start at line 413, edit line 419 var domain
        model:  'product.product',
        fields: ['display_name', 'lst_price', 'standard_price', 'categ_id', 'pos_categ_id', 'taxes_id',
                 'barcode', 'default_code', 'to_weight', 'uom_id', 'description_sale', 'description',
                 'product_tmpl_id','tracking', 'write_date', 'available_in_pos', 'attribute_line_ids'],
        order:  _.map(['sequence','default_code','name'], function (name) { return {name: name}; }),
        domain: function(self){
            var domain = ['&', '&', '&', ['sale_ok','=',true],['available_in_pos','=',true],'|',['company_id','=',self.config.company_id[0]],['company_id','=',false], ['qty_available', '>', 0]]; // edit here

add '&' and ['qty_available', '>', 0] like above

reference:

https://www.odoo.com/forum/help-1/question/automatically-remove-products-from-pos-when-products-are-out-of-stock-in-v8-0-123229

Friday, October 23, 2020

Odoo14: POS import products with category

Inventory Product Category

Create product category to import

For example my csv file

"External ID"    "Name"    "Parent Category/External ID"
"cat_besi_kayu"    "Cat Besi / Kayu"    "product.product_category_all"
"cat_besi_kayu_junior"    "Cat Besi / Kayu Junior"    "cat_besi_kayu"

Note:

  • first line is header
  • tab separator and "" string delimiter
  • product.product_category_all is build in root for all categories.

From Inventory -> Configuration -> Product Categories -> Favorites -> Import records, load your category csv file to import. Test it first before real import.

POS Product Category

Create POS product category to import

For example my csv file

"External ID"    "Category Name"    "Parent Category/External ID"
"all"    "All"    ""
"cat_besi_kayu"    "Cat Besi / Kayu"    "all"
"cat_besi_kayu_junior"    "Cat Besi / Kayu Junior"    "cat_besi_kayu"

Note:

  • first line is header
  • tab separator and "" string delimiter
  • product.product_category_all is build in root for all categories.

From Point of Sale -> Configuration -> Products -> POS Product Categories -> Favorites -> Import records, load your category csv file to import. Test it first before real import.

Product

Create products to import

For example my csv file

"ID";"Name";"Sales Price";"Cost";"Quantity On Hand";"Available in POS";"Can be Purchased";"Can be Sold";"Customer Taxes/Amount";"Description";"Product Category / External ID";"Product Type";"Point of Sale Category/Parent Category"
"Junior_66_NP657";"Junior 66 NP657";"80000";"75000";"0";"1";"1";"1";"0";"Septia Brown* Junior 66 Cat Besi/Kayu *0.2L 0.94L 3.785L 20L TC";"cat_besi_kayu_junior";"Storable Product";"cat_besi_kayu_junior"

Note:

  • first line is header
  • ; separator and "" string delimiter
  • cat_besi_kayu_junior is external ID from product category csv file.

From Inventory -> Configuration -> Products -> Products -> Favorites -> Import records, load your product csv file to import. Test it first before real import.

Monday, October 12, 2020

windows 11/10/8/7 general repair


Repair directory system

  1. run cmd as administrator or windows powershell (admin)
  2. run C:\WINDOWS\system32> chkdsk c: /f
  3. restart PC to complete chkdsk

Repair general windows file system

  1. run windows powershell (admin)
  2. run C:\WINDOWS\system32> sfc /scannow

Note: you can repair directory using chkdsk or repair file system using sfc in safe mode

If you encounter "windows can not fix" after running "sfc /scannow", you can try to repair windows 'image' file system

  1. run windows powershell (admin)
  2. run C:\WINDOWS\system32> DISM /Online /Cleanup-Image /RestoreHealth

Note: Yout need online to restore windows image

DIMS Option:

  • DISM /Online /Cleanup-Image /CheckHealth -> check windows 'image' system
  • DISM /Online /Cleanup-Image /ScanHealth -> check windows 'image' system, deeper then checkhealth
  • DISM /Online /Cleanup-Image /RestoreHealth  -> restore windows 'image' system
  • DISM /Online /Cleanup-Image /StartComponentCleanup -> repair windows component (after DISM Error 14098)

If you have windows 11/10/8/7 cd, F: is your CD/DVD ROM

  • DISM /Online /Cleanup-Image /RestoreHealth /Source:F:\Sources\install.wim

Sunday, October 4, 2020

Upgrade firmware Evercoss S50 Genpro X Pro V13 Maret 2018

Sistim PC yang digunakan:

  • windows Version 10.0.18362 Build 18362
  • QGDP_AssemblySPort_V3_1_8_0630_OFFLINE.rar
  • EVERCOSS_S50_7_0_021_P1_180314_OE_CPB.zip

Install QGDP_AssemblySPort_V3_1_8_0630_OFFLINE

  1. Download QGDP_AssemblySPort_V3_1_8_0630_OFFLINE.rar di http://evercoss.com/img/software/QGDP_AssemblySPort_V3_1_8_0630_OFFLINE.rar 
  2. extract dan install. bahasanya rada alien next aja, eh defaultnya aja. saya juga kagak tau mana nextnya

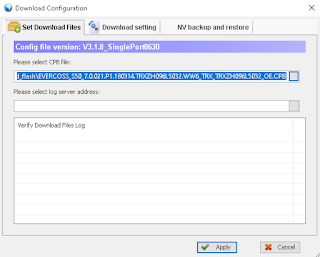
Download firmware EVERCOSS_S50_7_0_021_P1_180314_OE_CPB.zip dari situs Evercoss resminya di http://evercoss.com/download/detail/s50. Jangan ketukar dengan S50D! Lalu extract dan akan muncul file EVERCOSS_S50_7.0.021.P1.180314.TRXZH096L5032.WW6_TRX_TRXZH096L5032_OE.CPB.

Driver tidak diperlukan untuk windows 10 Version 10.0.18362 Build 18362

Upgrade firmware QGDP Assembly Single Port

  1. klik kanan aplikasi dan jalankan aplikasi dengan mode "Run as administrator"
  2. masukan User: Assembly dan password ase atau 369
  3. klik config
  4. masukan file cpb pada "Please select CPB file" dan klik Apply


  5. tunggu sampai selesai mengextract dan mengecek filenya.
  6. Setelah selesai, sabungkan handset Evercoss S50 (Genpro X Pro) yang akan di flash menggunakan kabel USB yang baik.
  7. tunggu sampai windows selesai menginstall drivernya. Biarkan posisi pada charging only.
  8. seletah selesai, klik start.
  9. setelah itu, dalam kondisi handset masih tersambung ke PC, restart handset. -> Kuncinya disini!


  10. bilamana tidak ada kendala, aplikasi akan mendeteksi handset dan memulai mengupdate firmware (persentase download & progress berjalan)
  11. tunggu sampai selesai. di log akan muncul Disconnect the device dan Downloading CPB: Successfull
  12. lepaskan kabel usb dari handset dan nyalakan handset 


Sunday, September 20, 2020

Debian Buster: install pgadmin4 (fresh postgresql 11)

  1. Download apt key https://www.pgadmin.org/static/packages_pgadmin_org.pub and add key
    # wget https://www.pgadmin.org/static/packages_pgadmin_org.pub
    # apt-key add packages_pgadmin_org.pub
  2. Create and append pgadmin4 repository
    # echo "deb https://ftp.postgresql.org/pub/pgadmin/pgadmin4/apt/$(lsb_release -cs) pgadmin4 main" > /etc/apt/sources.list.d/pgadmin4.list
  3. Run update & install pgadmin4-desktop
    # apt-get update
    # apt-get install pgadmin4-desktop

By default postgres user has no password in database (not system). You need to set/change postgres database password. From root linux shell
# su - postgres
$ psql
# \password
<type_your_password>

Try login to your postgres using psql
$ psql -U postgres  -h localhost
Password for user postgres:
psql (11.7 (Debian 11.7-0+deb10u1))
SSL connection (protocol: TLSv1.3, cipher: TLS_AES_256_GCM_SHA384, bits: 256, compression: off)
Type "help" for help.
postgres=#

After running pgadmin4, pgadmin4 server will started and the first time you need to create master password (NOTE: master password is password to use pgadmin4).

Connect to your local postgresql server

  1. From your browser http://127.0.0.1:41271/browser/, Add New Server
  2. Fill
    1. Connection: localhost (your connection name)
    2. Port: 5432
    3. Maintenance Database: postgres
    4. Username: postgres
    5. Password: <your password>
  3. and Save

Reference:
https://www.pgadmin.org/download/pgadmin-4-apt/


Sunday, September 6, 2020

odoo 13: FATAL: role "odoo" does not exist

symptom:

# tail /var/log/odoo/odoo-server.log
...
    conn = _connect(dsn, connection_factory=connection_factory, **kwasync)
psycopg2.OperationalError: FATAL:  role "odoo" does not exist - - -

Solution:

1. su as postgres user in your Debian

# su - postgres

2. run psql

$ psql
psql (11.7 (Debian 11.7-0+deb10u1))
Type "help" for help.

3. create role odoo to connect and exit

postgres=# create role odoo login createdb;
CREATE ROLE
postgres=# \q

Thursday, September 3, 2020

odoo 13: install on low end laptop Fujitsu MH330 Intel(R) Atom(TM) CPU N455 @ 1.66GHz RAM 2GB (Maximum)


Guide: Worker number calculation

    Rule of thumb : (#CPU * 2) + 1
    Cron workers need CPU
    1 worker ~= 6 concurrent users

cpu: 1 core (1 core 2 thread) Intel(R) Atom(TM) CPU N455 @ 1.66GHz
workers = 2+1

CPU time needs to be loonger to finish the task, we triple it.

Configuration:

workers = 3
;max_cron_threads = 2 ;default
;limit_time_cpu = 60 ;default
;limit_time_real = 120 ;default
max_cron_threads = 1
limit_time_cpu = 240
limit_time_real = 360

To install pos module, follow these sequence:

  1. Inventory
  2. Invoicing
  3. POS

Reference:

  • https://gist.github.com/Guidoom/d5db0a76ce669b139271a528a8a2a27f
  • https://www.odoo.com/documentation/13.0/setup/deploy.html

Monday, August 31, 2020

Debian Buster: build and install ZJ-5802 Portable Bluetooth Thermal Receipt Printer 58 mm


Install CUPS configurator

# apt-get install  system-config-printer

Installing ZJ-5802 Portable Bluetooth Thermal Receipt Printer driver

  1. install requirements
    # apt install build-essential cmake libcups2-dev libcupsimage2-dev
    wait, it takes some times.
  2. Download code (by click 'Code') from https://github.com/klirichek/zj-58
  3. create directory
    $ mkdir zj58master
  4. copy file
    $ cp zj-58-master.zip zj58master/
  5. extract
    $ cd zj58master/
    $ unzip zj-58-master.zip
  6. move to extraced folder
    $ cd zj-58-master/
  7. create directory to build source
    $ mkdir build
  8. move to build directory
    $ cd build/
  9. run cmake from source i.e. /home/[your_user_name]/Downloads/zj58master/zj-58-master
    $ cmake /home/dedetok/Downloads/zj58master/zj-58-master
  10. install as root from folder /home/[your_user_name]/Downloads/zj58master/zj-58-master/build
    # make install
  11. if there is no failure, you can configure your CUPS

Configure CUPS

  1. Applications -> Settings -> Print Settings
  2. Unlock printer
  3. Add (sign '+ ADD') Printer
  4. Select Device
        Devices: Unknown (Printer)
        Connection: USB
    click Forward
  5. Choose driver
        Select printer from database: Zijiang
    click Forward
        Models: Zj-58
        Drivers: Zijiang Zj-58 [en] (recommended)
    click Forward
        Leave blank on options (i.e. Cash Drawer 1, Cash Drawer 2, and Cutter. My model does not have these hardware)
    click Forward
  6. click Apply
  7. Print test page
  8. Your printer should be run properly

Reference:
https://github.com/klirichek/zj-58

odoo 13: point of sale (clean install)

First time you open odoo http://localhost:8069/web/database/selector, you need to create database for your store

Database Name    : castore
Email    : <your valid email>
Password    : ****
Phone number    :
Language    :English
Country    : Indonesia

Note: Default buildin user is "Administrator".

Note: you can select Language Indonesia if you wish
It takes sometime to complete, depend on your hardware. In my small laptop Asus Eee PC 1215B RAM 8GB, it takes about 2-3 minutes.

Configure Preferences
go to Administrator (drop down) -> Preferences
Timezone    : Asia/Jakarta
and save.

Configure your company (store),
go to Settings -> Users & Companies -> Companies -> My Company -> Edit
Company Name    : <your company/store>
Currency    : IDR
and Save.

Add Apps, go to Apps
Apps -> Point of Sale -> Install (will install Inventory and Invoicing)
Apps -> Sales -> Install

Configure products
Inventory -> Master Data -> Products -> Create
Product Name    : lacquer isamu 250 gram
    Can be Sold
    Can be Purchased
General Information
    Product Type    : Storable Product
    Product Category    : All
    Sales Price    : 30000
    Cost    : 20000
To add picture/icon, at camera icon click Edit
Then click On Hand -> Create
On Hand Quantity    : 10000
and Save.
Edit your previous product (i.e. lacquer isamu 250 gram)
Point of Sale
    Available in POS: checked
    Category -> Create and Edit
        Category Name: iron putty
        Parent Category: <blank>
        and save.
and save.


Try your Point of Sale
Point of Sale -> New Session
lacquer isamu 250 gram
change Qty (quantity) to 2.
change Price to 25000
make Payment -> Cash
Tendered: 60000
Validate and you can print reciept.

Done. You can now add more products to sell.
 

Reference:
https://www.planet-odoo.com/odoo-13-point-of-sale-a-complete-guide-to-point-of-sales-features-payments-pricing/

Wednesday, August 26, 2020

odoo 13: install on Debian 10.5

Install PostgreSQL
# apt-get install postgresql

Install package wkhtmltopdf
# apt-get install wkhtmltopdf

Install package python3-xlwt
# apt-get install python3-xlwt

Install package python3-num2words
# apt-get install python3-num2words

Add odoo 13 repository and install
1. download repository key and install
# wget https://nightly.odoo.com/odoo.key
# apt-key add odoo.key
2. add odoo 13 to /etc/apt/sources.list
...
# odoo
deb http://nightly.odoo.com/13.0/nightly/deb/ ./
3. update your repository
# apt-get update
4. install odoo 13
# apt-get install odoo

My complete /etc/apt/sources.list
# security
deb http://security.debian.org/debian-security buster/updates main

# main
deb http://kartolo.sby.datautama.net.id/debian/ buster main

# non free
deb http://httpredir.debian.org/debian buster main contrib non-free

# backport
deb http://ftp.debian.org/debian buster-backports main

# odoo
deb http://nightly.odoo.com/13.0/nightly/deb/ ./

Note: nightly build will release everyday, If you don't need to update it daily, you may comment out odoo in /etc/apt/sources.list.

After finish, you can open your odoo using firefox http://localhost:8069/.

Reference:
https://www.odoo.com/documentation/13.0/setup/install.html

Monday, August 24, 2020

Dolibarr ERP 12: Configure your TakePOS for small retail

Start your company
Home -> Setup -> Company/Organization
Tab Company
    Name is mandatory
    Country is mandatory
    Sales Tax Management for small company choose "Sales tax is not used"
Tab Opening hours
    Monday - Sunday for example 7-12 13-16 means open from 7am, at 12pm, close at 16pm.

Enabling module Financial Modules (Accounting/Treasury) -> Banks & Cash
After enable, from Top Bar go to Banks | Cash
Create New financial account
    Ref.: cash0001
    Bank or cash label: Cash
    Account type: Cash Account
    Currency: Indonesia
    Status: Open
    Account country: Indonesia
    Initial balance: 5000000

Enabling module Customer Relationship Management (CRM) -> Third Parties
After enable, from Top Bar go to Third Parties.
Create Third-party (New Customer)
    Third-party name: "Unknown 3rd party"
    Prospect / Customer: "Customer"
Create Contacts/Addresses
    Last name / Label: "Unknown Customer"
    Third-party: "Unknown 3rd party"

Enabling module
    Product Management (PM) -> Prodcuts
    Product Management (PM) -> Stocks
    Multi-modules tools -> Tags/categories
After enable, from Top Bar go to Products.
New warehouse
    Ref.: local
    Short name location: local001
New product
    Ref.: Isamu_Lacquer_1_4kg
    Label: Isamu Lacquer 1/4kg
    Status (Sell): For sale
    Status (Purchase): For purchase
    Default warehouse: local
    Nature of product (material/finished):  Manufactured product
    Selling price: 25000
    Min. sell price: 23000
    Tag/categories: dempul besi (modify from Product -> Tags/Category)
and save.
List or Stocks -> choose Isamu_Lacquer_1_4kg -> tab Stock -> Correct Stock
    Warehouse: local
    Number of untis: 50
    Unit Purchase price: 21000
and save.

TakePOS
Enabling module Websites and other frontal application -> TakePOS
After enable, click icon setting.
In Parameters, Enabling Simple
Enable:
    Group VAT by rate in tickets|receipts
    Group same products lines
    Use payment icon on numpad
    Direct cash payment button
    Control cash box at opening pos
and Save.
in tab Terminal 1
    Default generic third party to use for sales: "Unknown 3rd Party"
    Default account to use to receive cash payments: Cash
and Save.

To start TakePOS, from Top Bar go to POS -> Start and Save

Sunday, August 23, 2020

Membuat Presensi/Absensi sekolah secara sederhana

 Login ke google melalui browser.

Siapkan google drive untuk menyimpan presensi:

  1. buka https://drive.google.com/drive/my-drive
  2. pilih "New" -> "Folder"
  3. masukan nama folder misalnya "presensi" -> "CREATE"

Membuat google form untuk presensi:

  1. dari google drive, buka folder yang baru yang dibuat (folder presensi)
  2. klik "New" -> "More" -> "Google Forms" -> "Blank form"
  3. ganti judul "Untitle form" menjadi "Presensi/Absensi"
  4. ganti "Untitle Questions" menjadi "kelas"
  5. rubah "Multiple Choice" menjadi "Dropdown"
  6. aktifkan "Required"
  7. tambahkan question melalui icon "+" -> "Add question"
  8. isi question dengan "tanggal"
  9. rubah "Multiple choice" dengan "Date"
  10. aktifkan "Required"
  11. tambahkan question melalui icon "+" -> "Add question"
  12. isi question dengan "nama"
  13. rubah "Multiple choice" dengan "Short Answer"
  14. aktifkan "Required"

(Opsional) Konfigurasi form presensi/absensi:

  1. 1. klik tombol settings (disamping tombol "Send")
  2. 2. Collect email address
  3. 3. Bila presensi/absensi akan dibuat per pertemuan dan siswa hanya bisa absen 1 kali, aktifkan opsi "Limit to 1 response"

Google form anda telah siap dan tersimpan di google driver folder "presensi" dengan nama "Presensi/Absensi" 

Untuk mengirimkan google form tersebut, buka google form presensi yang telah dibuat, lalu klik "Send" dan pilih link. Copy link yang akan dishare ke group whatsapp atau peserta lainnya.

Folder presensi tersebut dapat dishare ke guru/admin sekolah untuk dicopy (dibutuhkan akun google dari guru/admin).

Friday, August 21, 2020

Dolibarr ERP: 12.0.2 on Debian 10.5

Download stable version dolibarr-12.0.2.tgz from Source Forge -> Dolibarr ERP-CRM https://sourceforge.net/projects/dolibarr/files/. Extract dolibarr-12.0.2.tgz and move folder htdocs to your web root or subfolder.
 
Create user and mariadb database for Dolibar.

Move to your dolibarr web root. Copy configuration example conf folder and make it writeable during installation.
$ cp conf/conf.php.example conf/conf.php
$ chmod o+w conf/conf.php

Create directory documents and make it writeable.
$ mkdir documents
$ chmod o+w documents/


Install Dolibarr using your browser http://localhost/tes/dolibarr/
Ok PHP Version 7.3.19-1~deb10u1 (More information)
Ok This PHP supports variables POST and GET.
Ok This PHP supports sessions.
Ok This PHP supports GD graphical functions.
Ok This PHP supports Curl.
Ok This PHP supports calendars extensions.
Ok This PHP supports UTF8 functions.
Ok This PHP supports Intl functions.
Ok This PHP supports ZIP functions.
Ok Your PHP max session memory is set to 128M. This should be enough.
Ok Configuration file htdocs/conf/conf.php exists.
Ok Configuration file htdocs/conf/conf.php is writable.

Fill database login and password
Configuration file
Saving parameters to ../conf/conf.php    Ok
Reloading parameters from configuration file.    Ok
Server connection (User dolibarr) : localhost    Ok
Database connection (User dolibarr) : dolibarr    Ok

Your Dolibarr ready to install, wait until installation finish.

Last installation, create user admin and password.
olibarr admin login
Last step: Define here the login and password you wish to use to connect to Dolibarr. Do not lose this as it is the master account to administer all other/additional user accounts.

Dolibarr administrator login 'admin' created successfully.
This installation is complete.
Warning, for security reasons, once the install or upgrade is complete, you should add a file called install.lock into the Dolibarr document directory in order to prevent the accidental/malicious use of the install tools again.

You need to configure Dolibarr to suit your needs (appearance, features, ...).

Add file install.lock
$ touch install.lock

Conguratulation! Your Dolibar 12.0.2 is ready to configure to meet your company requirement and use.

Test on Debian 10.5 Kernel Version 4.19.0-10-amd64

Sunday, August 9, 2020

Windows 10 sharing printer on private network only


  1. Enabling Windows sharing "Manage advanced sharing setings"
    1. Private
      1. Turn on network discovery & Turn on automativ setup of network connected device
      2. Turn on file and printer sharing
    2. Guest or Public
      1. Turn off network discovery
      2. Turn off file and printer sharing
    3. All networks
      1. Turn off Public folder sharing (people logged on to this computer can still access these folders)
      2. Use 128-bit encryption to help protect file sharing connectin (recommended)
      3. Turn off password protected sharing
  2. Enabling guest user, open cmd with "Run as administrator" permission
        >net user guest /active:yes
  3. Share printer, "Printers & Scanners", choose printer to share, "Manage" -> "Printer properties"
    1.     Sharing
      1.         Share this printer (optional: you can change share name)
      2.         Render print-jobs on client computer
    2.     Security
      1.         Everyone: Print, Manage this printer, Manage documents
      2.         Guest: Print, Manage this printer, Manage documents (add group or user name)


Warning: only use on private network!!!

Caution: use with your own security risk on non private network!!!

Note:

  • Some Windows 10 update, version 1903 or later, may have some problem with your printer driver and printer sharing. You need to find solution on microsoft site if reinstall and reconnect your printer does not solved your problem.
  • You can not share printer if the printer is offline

Monday, August 3, 2020

Debian Buster: Installing zoom client meeting

Download zoom client meeting from https://zoom.us/download?os=linux

Install dependency
# apt-get install dconf-cli gir1.2-ibus-1.0 ibus ibus-clutter ibus-gtk ibus-gtk3 im-config libclutter-1.0-0 libclutter-1.0-common libclutter-imcontext-0.1-0 libclutter-imcontext-0.1-bin libcogl-common libcogl-pango20 libcogl-path20 libcogl20 libdouble-conversion1 libibus-1.0-5 libpcre2-16-0 libqt5core5a libqt5dbus5 libqt5gui5 libqt5network5 libqt5svg5 libqt5widgets5 libxcb-icccm4 libxcb-image0 libxcb-keysyms1 libxcb-randr0 libxcb-render-util0 libxcb-xinerama0 libxcb-xkb1 libxcb-xtest0 libxkbcommon-x11-0 qt5-gtk-platformtheme qttranslations5-l10n

Install zoom client meeting
# dpkg -i zoom_amd64.deb
(Reading database ... 93758 files and directories currently installed.)
Preparing to unpack zoom_amd64.deb ...
Unpacking zoom (5.1.422789.0705) over (5.1.422789.0705) ...
run post uninstall script, action is upgrade ...
Setting up zoom (5.1.422789.0705) ...
run post install script, action is configure...
Processing triggers for desktop-file-utils (0.23-4) ...
Processing triggers for mime-support (3.62) ...
Processing triggers for shared-mime-info (1.10-1) ...

Screenshoot zoom client:

Screenshoot zoom setting:


Tested XFCE Desktop on Debian 10.5 linux-image 4.19.0-10-amd64

Saturday, July 18, 2020

GPON AN5506-04-F: Enabling routing in Lan port 1


Network schema
   192.168.1.1 (Router Wifi GPON AN5506-04-F)
        |________________________________
        |            |           |           |          |
      wifi 1  port 1  port 2  port 3  port 4
                     |
                     |
                     | DHCP client/port Uplink (TP-Link TL-WR720N)
                     |_____________________
                     |                 |           |
                  wifi 2        port 1  port 2


Login to router GPON

GPON port 3 connected to Indihome STB (It depends on your installation)


We are going to connect TL-TP720N Uplink to GPON Port 1 and enabling GPON Port 1.
Note: blue pencils are existing configuration, red pencil is a modification.

Save your new configuration, and your TP-TP720N is ready to act as router.

Thursday, July 2, 2020

Debian Buster: configure local dns cache for Indihome user

To make your debian faster to lookup name server, it is better to use local dns cache.


Install dnsmasq
# apt-get install dnsmasq

Install NetworkManager
# apt-get install network-manager

Edit /etc/NetworkManager/NetworkManager.conf
[main]
plugins=ifupdown,keyfile
dns=dnsmasq

Edit /etc/NetworkManager/system-connections/[your connection profile]
[ipv4]
dns=8.8.8.8;1.1.1.1;
dns-search=8.8.8.8;1.1.1.1;
method=auto

Restart your network manager
# systemctl restart network-manager

Try your local dns cache
# dig garasiku.my.id @localhost
# dig google.com @localhost

Tested on Debian 10.4

Friday, June 26, 2020

Debian Buster: Manual add DNS Server for Indihome user

Before manual editing connections:

# apt-get update
Hit:1 http://ftp.debian.org/debian buster-backports InRelease                 
Err:3 http://kartolo.sby.datautama.net.id/debian buster InRelease             
  Temporary failure resolving 'kartolo.sby.datautama.net.id'
Err:2 http://httpredir.debian.org/debian buster InRelease                     
  Connection failed [IP: 36.86.63.180 80]
Err:4 http://security.debian.org/debian-security buster/updates InRelease
  Connection failed [IP: 36.86.63.180 80]
Reading package lists... Done
W: Failed to fetch http://security.debian.org/debian-security/dists/buster/updates/InRelease  Connection failed [IP: 36.86.63.180 80]
W: Failed to fetch http://kartolo.sby.datautama.net.id/debian/dists/buster/InRelease  Temporary failure resolving 'kartolo.sby.datautama.net.id'
W: Failed to fetch http://httpredir.debian.org/debian/dists/buster/InRelease  Connection failed [IP: 36.86.63.180 80]
W: Some index files failed to download. They have been ignored, or old ones used instead.

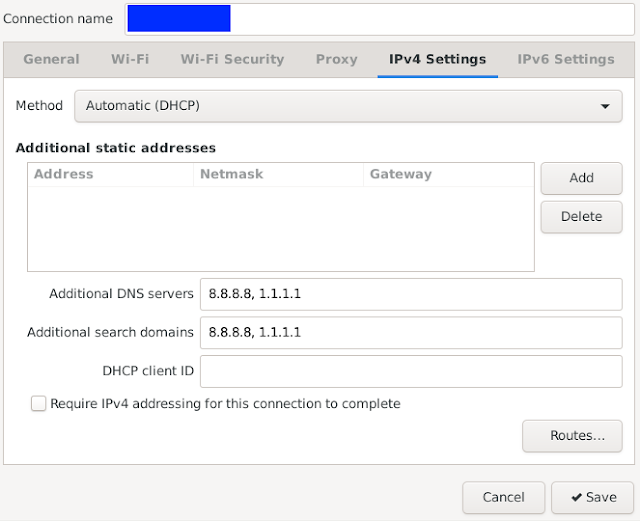
Add DNS Server manually by editing connections. Add 8.8.8.8, 1.1.1.1 in
  1. IPv4 Settings -> Additional DNS Servers
  2. IPv4 Settings -> Additional search domains


After manual editing connections:
# apt-get update
Hit:1 http://httpredir.debian.org/debian buster InRelease                     
Hit:2 http://ftp.debian.org/debian buster-backports InRelease                 
Hit:3 http://kartolo.sby.datautama.net.id/debian buster InRelease             
Hit:4 http://security.debian.org/debian-security buster/updates InRelease
Reading package lists... Done


Tuesday, May 19, 2020

Debian Buster: Installing Google Chrome from Google Repository

Add and edit Google Chrome Repository

# cd /etc/apt/sources.list.d/
# touch google.list
# vi google.list

    # Google Chrome
    deb http://dl.google.com/linux/chrome/deb/ stable main

Add Google Linux Package Signing Keys

# wget -q -O - https://dl.google.com/linux/linux_signing_key.pub | sudo apt-key add

Update repository and install google chrome

# apt-get install google-chrome-stable

To install Google Earth, add at the end of google.list file or create a new file in folder /etc/apt/source.list.d/

    # Google Earth
    deb http://dl.google.com/linux/earth/deb/ stable main

Reference:

Friday, May 8, 2020

Debian Buster: Preparing Debian for Video Call Meeting

Check internal or usb camera is working properly.

# dmesg | grep Video
[    0.504995] ACPI: Added _OSI(Linux-Dell-Video)
[    0.576610] pci 0000:00:01.0: Video device with shadowed ROM at [mem 0x000c0000-0x000dffff]
[    2.702573] ACPI: Video Device [VGA] (multi-head: yes  rom: no  post: no)
[    2.703765] input: Video Bus as /devices/LNXSYSTM:00/LNXSYBUS:00/PNP0A03:00/device:2e/LNXVIDEO:00/input/input6
[    2.703902] ACPI: Video Device [VGA1] (multi-head: yes  rom: no  post: no)
[    2.705790] input: Video Bus as /devices/LNXSYSTM:00/LNXSYBUS:00/PNP0A03:00/LNXVIDEO:01/input/input7
[   27.192685] USB Video Class driver (1.1.1)

# ls /dev/ | grep video
video0
video1

Try your camera and microhpne using guvcview. Make a capture photo or make a simple video.
# apt-get install  guvcview  

Use your user account to run guvcview. The application will be at Multimedia -> gucvview.

Your photo and view will be save at home directory. Video by default will be save in mkv format file.

Now your ready to install other video meeting application for work from home or shool from home.

If you have trouble using internal on old Lenovo Laptop (such as Lenovo G40-45, Lenovo B475, etc) that running Windows 10 build 1903 or later, you can try linux live CD to use your internal camera
 
Tested on:
Debian 10.3 Linux 4.19.0-8-amd64
Laptop Asus K45DR

#TOGETHERFIGHTCOVID19
#WORKFROMHOME
#STUDYFROMHOME

Thursday, March 5, 2020

Berhati-hati bila menerima pesan untuk menjalankan MMI code

akhir2 ini banyak terjadi pengambil alihan nomor melalui kode MMI. hal ini karena pengguna memang tidak perlu menggunakan kode MMI untuk keperluan normal sehari-hari.

Apa itu MMI?
MMI = Man-Machine Interface
MMI ditandai oleh asterisk (*) atau hash (#)

MMI dibagi menjadi 2:
1. Supplementary Service (SS) codes
2. Unstructured Supplementary Service Data (USSD) codes

berikut ini USSD code yang digunakan oleh orang yang berniat jahat:
divert call kode **02, **004, **21, **61, **62, **67
forward sms: tergantung provider

divert call yang paling berhaya adalah **21, yang akan mendivert semua panggilan!
untuk mengujinya gunakan *#21#. bila ingin menghapusnya gunakan #21#.

pengguna akan dicharge untuk setiap sms
forward sms telkomsel *500*22#
forward sms xl *123*571#
forward sms indosat/ooredoo *123*600

sebenarnya hal ini berguna bagi yang menggunakan nomor telepon lebih dari 1 nomor.

Penting:
berhati-hati dalam menggunakan MMI. kecuali anda tahu apa yang anda lakukan.

https://en.wikipedia.org/wiki/Unstructured_Supplementary_Service_Data
https://berlin.ccc.de/~tobias/mmi-ussd-ss-codes-explained.html
https://www.ma-no.org/en/security/unlock-hidden-smartphone-features-with-these-secret-codes
http://inspiratron.org/blog/2015/05/14/ussd-code-list-for-android-smartphone/
http://newbie-season.blogspot.com/2016/07/Cara-Mudah-Menyadap-SMS-Untuk-Semua-Operator-Tanpa-Aplikasi.html