Sunday, October 4, 2020

Upgrade firmware Evercoss S50 Genpro X Pro V13 Maret 2018

Sistim PC yang digunakan:

  • windows Version 10.0.18362 Build 18362
  • QGDP_AssemblySPort_V3_1_8_0630_OFFLINE.rar
  • EVERCOSS_S50_7_0_021_P1_180314_OE_CPB.zip

Install QGDP_AssemblySPort_V3_1_8_0630_OFFLINE

  1. Download QGDP_AssemblySPort_V3_1_8_0630_OFFLINE.rar di http://evercoss.com/img/software/QGDP_AssemblySPort_V3_1_8_0630_OFFLINE.rar 
  2. extract dan install. bahasanya rada alien next aja, eh defaultnya aja. saya juga kagak tau mana nextnya

Download firmware EVERCOSS_S50_7_0_021_P1_180314_OE_CPB.zip dari situs Evercoss resminya di http://evercoss.com/download/detail/s50. Jangan ketukar dengan S50D! Lalu extract dan akan muncul file EVERCOSS_S50_7.0.021.P1.180314.TRXZH096L5032.WW6_TRX_TRXZH096L5032_OE.CPB.

Driver tidak diperlukan untuk windows 10 Version 10.0.18362 Build 18362

Upgrade firmware QGDP Assembly Single Port

  1. klik kanan aplikasi dan jalankan aplikasi dengan mode "Run as administrator"
  2. masukan User: Assembly dan password ase atau 369
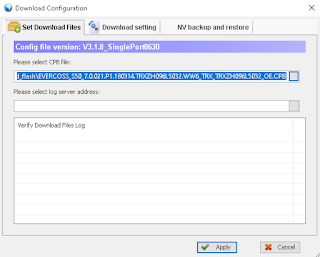
  3. klik config
  4. masukan file cpb pada "Please select CPB file" dan klik Apply


  5. tunggu sampai selesai mengextract dan mengecek filenya.
  6. Setelah selesai, sabungkan handset Evercoss S50 (Genpro X Pro) yang akan di flash menggunakan kabel USB yang baik.
  7. tunggu sampai windows selesai menginstall drivernya. Biarkan posisi pada charging only.
  8. seletah selesai, klik start.
  9. setelah itu, dalam kondisi handset masih tersambung ke PC, restart handset. -> Kuncinya disini!


  10. bilamana tidak ada kendala, aplikasi akan mendeteksi handset dan memulai mengupdate firmware (persentase download & progress berjalan)
  11. tunggu sampai selesai. di log akan muncul Disconnect the device dan Downloading CPB: Successfull
  12. lepaskan kabel usb dari handset dan nyalakan handset 


Sunday, September 20, 2020

Debian Buster: install pgadmin4 (fresh postgresql 11)

  1. Download apt key https://www.pgadmin.org/static/packages_pgadmin_org.pub and add key
    # wget https://www.pgadmin.org/static/packages_pgadmin_org.pub
    # apt-key add packages_pgadmin_org.pub
  2. Create and append pgadmin4 repository
    # echo "deb https://ftp.postgresql.org/pub/pgadmin/pgadmin4/apt/$(lsb_release -cs) pgadmin4 main" > /etc/apt/sources.list.d/pgadmin4.list
  3. Run update & install pgadmin4-desktop
    # apt-get update
    # apt-get install pgadmin4-desktop

By default postgres user has no password in database (not system). You need to set/change postgres database password. From root linux shell
# su - postgres
$ psql
# \password
<type_your_password>

Try login to your postgres using psql
$ psql -U postgres  -h localhost
Password for user postgres:
psql (11.7 (Debian 11.7-0+deb10u1))
SSL connection (protocol: TLSv1.3, cipher: TLS_AES_256_GCM_SHA384, bits: 256, compression: off)
Type "help" for help.
postgres=#

After running pgadmin4, pgadmin4 server will started and the first time you need to create master password (NOTE: master password is password to use pgadmin4).

Connect to your local postgresql server

  1. From your browser http://127.0.0.1:41271/browser/, Add New Server
  2. Fill
    1. Connection: localhost (your connection name)
    2. Port: 5432
    3. Maintenance Database: postgres
    4. Username: postgres
    5. Password: <your password>
  3. and Save

Reference:
https://www.pgadmin.org/download/pgadmin-4-apt/


Sunday, September 6, 2020

odoo 13: FATAL: role "odoo" does not exist

symptom:

# tail /var/log/odoo/odoo-server.log
...
    conn = _connect(dsn, connection_factory=connection_factory, **kwasync)
psycopg2.OperationalError: FATAL:  role "odoo" does not exist - - -

Solution:

1. su as postgres user in your Debian

# su - postgres

2. run psql

$ psql
psql (11.7 (Debian 11.7-0+deb10u1))
Type "help" for help.

3. create role odoo to connect and exit

postgres=# create role odoo login createdb;
CREATE ROLE
postgres=# \q

Thursday, September 3, 2020

odoo 13: install on low end laptop Fujitsu MH330 Intel(R) Atom(TM) CPU N455 @ 1.66GHz RAM 2GB (Maximum)


Guide: Worker number calculation

    Rule of thumb : (#CPU * 2) + 1
    Cron workers need CPU
    1 worker ~= 6 concurrent users

cpu: 1 core (1 core 2 thread) Intel(R) Atom(TM) CPU N455 @ 1.66GHz
workers = 2+1

CPU time needs to be loonger to finish the task, we triple it.

Configuration:

workers = 3
;max_cron_threads = 2 ;default
;limit_time_cpu = 60 ;default
;limit_time_real = 120 ;default
max_cron_threads = 1
limit_time_cpu = 240
limit_time_real = 360

To install pos module, follow these sequence:

  1. Inventory
  2. Invoicing
  3. POS

Reference:

  • https://gist.github.com/Guidoom/d5db0a76ce669b139271a528a8a2a27f
  • https://www.odoo.com/documentation/13.0/setup/deploy.html

Monday, August 31, 2020

Debian Buster: build and install ZJ-5802 Portable Bluetooth Thermal Receipt Printer 58 mm


Install CUPS configurator

# apt-get install  system-config-printer

Installing ZJ-5802 Portable Bluetooth Thermal Receipt Printer driver

  1. install requirements
    # apt install build-essential cmake libcups2-dev libcupsimage2-dev
    wait, it takes some times.
  2. Download code (by click 'Code') from https://github.com/klirichek/zj-58
  3. create directory
    $ mkdir zj58master
  4. copy file
    $ cp zj-58-master.zip zj58master/
  5. extract
    $ cd zj58master/
    $ unzip zj-58-master.zip
  6. move to extraced folder
    $ cd zj-58-master/
  7. create directory to build source
    $ mkdir build
  8. move to build directory
    $ cd build/
  9. run cmake from source i.e. /home/[your_user_name]/Downloads/zj58master/zj-58-master
    $ cmake /home/dedetok/Downloads/zj58master/zj-58-master
  10. install as root from folder /home/[your_user_name]/Downloads/zj58master/zj-58-master/build
    # make install
  11. if there is no failure, you can configure your CUPS

Configure CUPS

  1. Applications -> Settings -> Print Settings
  2. Unlock printer
  3. Add (sign '+ ADD') Printer
  4. Select Device
        Devices: Unknown (Printer)
        Connection: USB
    click Forward
  5. Choose driver
        Select printer from database: Zijiang
    click Forward
        Models: Zj-58
        Drivers: Zijiang Zj-58 [en] (recommended)
    click Forward
        Leave blank on options (i.e. Cash Drawer 1, Cash Drawer 2, and Cutter. My model does not have these hardware)
    click Forward
  6. click Apply
  7. Print test page
  8. Your printer should be run properly

Reference:
https://github.com/klirichek/zj-58