Friday, June 26, 2020

Debian Buster: Manual add DNS Server for Indihome user

Before manual editing connections:

# apt-get update
Hit:1 http://ftp.debian.org/debian buster-backports InRelease                 
Err:3 http://kartolo.sby.datautama.net.id/debian buster InRelease             
  Temporary failure resolving 'kartolo.sby.datautama.net.id'
Err:2 http://httpredir.debian.org/debian buster InRelease                     
  Connection failed [IP: 36.86.63.180 80]
Err:4 http://security.debian.org/debian-security buster/updates InRelease
  Connection failed [IP: 36.86.63.180 80]
Reading package lists... Done
W: Failed to fetch http://security.debian.org/debian-security/dists/buster/updates/InRelease  Connection failed [IP: 36.86.63.180 80]
W: Failed to fetch http://kartolo.sby.datautama.net.id/debian/dists/buster/InRelease  Temporary failure resolving 'kartolo.sby.datautama.net.id'
W: Failed to fetch http://httpredir.debian.org/debian/dists/buster/InRelease  Connection failed [IP: 36.86.63.180 80]
W: Some index files failed to download. They have been ignored, or old ones used instead.

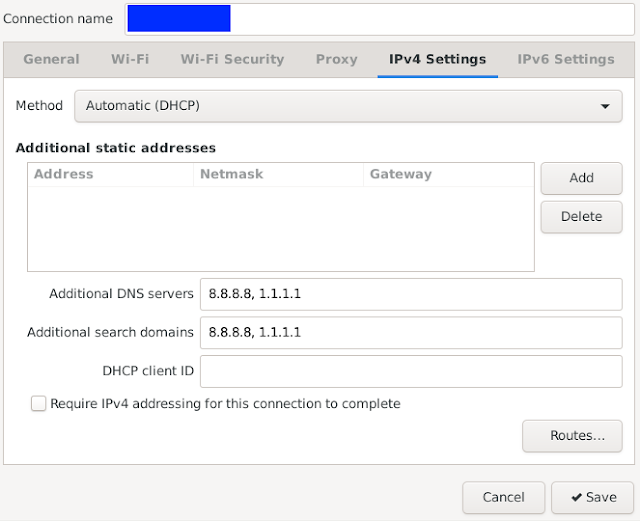
Add DNS Server manually by editing connections. Add 8.8.8.8, 1.1.1.1 in
  1. IPv4 Settings -> Additional DNS Servers
  2. IPv4 Settings -> Additional search domains


After manual editing connections:
# apt-get update
Hit:1 http://httpredir.debian.org/debian buster InRelease                     
Hit:2 http://ftp.debian.org/debian buster-backports InRelease                 
Hit:3 http://kartolo.sby.datautama.net.id/debian buster InRelease             
Hit:4 http://security.debian.org/debian-security buster/updates InRelease
Reading package lists... Done

Tuesday, May 19, 2020

Debian Buster: Installing Google Chrome from Google Repository

Add and edit Google Chrome Repository

# cd /etc/apt/sources.list.d/
# touch google.list
# vi google.list

    # Google Chrome
    deb http://dl.google.com/linux/chrome/deb/ stable main

Add Google Linux Package Signing Keys

# wget -q -O - https://dl.google.com/linux/linux_signing_key.pub | sudo apt-key add

Update repository and install google chrome

# apt-get install google-chrome-stable

To install Google Earth, add at the end of google.list file or create a new file in folder /etc/apt/source.list.d/

    # Google Earth
    deb http://dl.google.com/linux/earth/deb/ stable main

Reference:

Friday, May 8, 2020

Debian Buster: Preparing Debian for Video Call Meeting

Check internal or usb camera is working properly.

# dmesg | grep Video
[    0.504995] ACPI: Added _OSI(Linux-Dell-Video)
[    0.576610] pci 0000:00:01.0: Video device with shadowed ROM at [mem 0x000c0000-0x000dffff]
[    2.702573] ACPI: Video Device [VGA] (multi-head: yes  rom: no  post: no)
[    2.703765] input: Video Bus as /devices/LNXSYSTM:00/LNXSYBUS:00/PNP0A03:00/device:2e/LNXVIDEO:00/input/input6
[    2.703902] ACPI: Video Device [VGA1] (multi-head: yes  rom: no  post: no)
[    2.705790] input: Video Bus as /devices/LNXSYSTM:00/LNXSYBUS:00/PNP0A03:00/LNXVIDEO:01/input/input7
[   27.192685] USB Video Class driver (1.1.1)

# ls /dev/ | grep video
video0
video1

Try your camera and microhpne using guvcview. Make a capture photo or make a simple video.
# apt-get install  guvcview  

Use your user account to run guvcview. The application will be at Multimedia -> gucvview.

Your photo and view will be save at home directory. Video by default will be save in mkv format file.

Now your ready to install other video meeting application for work from home or shool from home.

If you have trouble using internal on old Lenovo Laptop (such as Lenovo G40-45, Lenovo B475, etc) that running Windows 10 build 1903 or later, you can try linux live CD to use your internal camera
 
Tested on:
Debian 10.3 Linux 4.19.0-8-amd64
Laptop Asus K45DR

#TOGETHERFIGHTCOVID19
#WORKFROMHOME
#STUDYFROMHOME

Thursday, March 5, 2020

Berhati-hati bila menerima pesan untuk menjalankan MMI code

akhir2 ini banyak terjadi pengambil alihan nomor melalui kode MMI. hal ini karena pengguna memang tidak perlu menggunakan kode MMI untuk keperluan normal sehari-hari.

Apa itu MMI?
MMI = Man-Machine Interface
MMI ditandai oleh asterisk (*) atau hash (#)

MMI dibagi menjadi 2:
1. Supplementary Service (SS) codes
2. Unstructured Supplementary Service Data (USSD) codes

berikut ini USSD code yang digunakan oleh orang yang berniat jahat:
divert call kode **02, **004, **21, **61, **62, **67
forward sms: tergantung provider

divert call yang paling berhaya adalah **21, yang akan mendivert semua panggilan!
untuk mengujinya gunakan *#21#. bila ingin menghapusnya gunakan #21#.

pengguna akan dicharge untuk setiap sms
forward sms telkomsel *500*22#
forward sms xl *123*571#
forward sms indosat/ooredoo *123*600

sebenarnya hal ini berguna bagi yang menggunakan nomor telepon lebih dari 1 nomor.

Penting:
berhati-hati dalam menggunakan MMI. kecuali anda tahu apa yang anda lakukan.

https://en.wikipedia.org/wiki/Unstructured_Supplementary_Service_Data
https://berlin.ccc.de/~tobias/mmi-ussd-ss-codes-explained.html
https://www.ma-no.org/en/security/unlock-hidden-smartphone-features-with-these-secret-codes
http://inspiratron.org/blog/2015/05/14/ussd-code-list-for-android-smartphone/
http://newbie-season.blogspot.com/2016/07/Cara-Mudah-Menyadap-SMS-Untuk-Semua-Operator-Tanpa-Aplikasi.html